---
url: /community/1.error_code.md
---
# 附录:Artus 通用异常表 Appendix: Artus Common Error-Code List
TODO
---
url: /community/2.package.md
---
# 附录:Artus 官方提供包列表 Appendix: Artus Official Package List
## 核心主包
* @artusjs/core
## 基础依赖库
* @artusjs/injection
* @artusjs/pipeline
## 协议实现
* HTTP(1.1/2/QUIC)
* WebSocket
* Timer
* MQ-Kafka(待定)
* MQ-RocketMQ(待定)
* gRPC(待定)
* Dubbo(待定)
## 工具库
* @artusjs/analytics
* 元数据分析、Dump
* @artusjs/manifest-generator
* 生成加载用的 Manifest
## 社区库
* @artusx/koa
* @artus-cli/artus-cli
---
url: /community/3.fundamental.md
---
# 附录:Artus 术语表 Appendix: Artus Fundamental List
TODO
---
url: /community/4.convention.md
---
# 文档编写格式约定 Convention
## 存放形式
* 所有文档存放于 `pages` 目录下;
* 按照对应的模块可建立对应的子目录,如 `core`;
* 文档格式均为 `Markdown(.md|.mdx)`;
* 命名遵循 `${序号}.${英文简写,空格由_代替}.md` 的格式;
* 编写完成的文档需要补充到外层 README 的目录中。
## 语言与排版
* 所有文档的第一语言均为**中文**;
* 文字排版请遵守 [中文文案排版指北](https://github.com/sparanoid/chinese-copywriting-guidelines);
* 亦可参考进行过修订的 [这篇](https://github.com/mzlogin/chinese-copywriting-guidelines);
* 其中的争议部分,如非必要,建议仍参照执行,减少因个人习惯造成的风格差异。
* Markdown 编写第一行格式为 `# ${中文标题} ${英文标题,首字母大写}`;
* Markdown 文件使用 [markdownlint](https://github.com/DavidAnson/markdownlint) 确保格式正确。
* [Visual Studio Code 插件](https://marketplace.visualstudio.com/items?itemName=DavidAnson.vscode-markdownlint) 十分有用。
## 习惯要求
* 请在编写时一直使用 `一般时态` 和 `第二三人称`,避免使用 `我`、`我们` 以及所在组织的名称;
* 文档风格参考 [中文技术文档写作风格指南](https://zh-style-guide.readthedocs.io/zh_CN/latest/)。
## 归档规则
* 文档的最新版本应当被更新到 `master` 分支;
* `master` 分支的最新 `HEAD` 应当是唯一有效的版本;
* 新的文档草稿通过以 `draft/` 开始的临时分支予以管理和协作,按里程碑管理;
* 正式文档通过以 `wip/` 开始的临时分支予以管理和协作,较小的改动可以通过 `Pull Request` 机制予以提交;
* 相关历史文档的归档通过 `Git Tag` 形式予以保留。
---
url: /core/1.introduction.md
---
# 架构介绍 Introduction
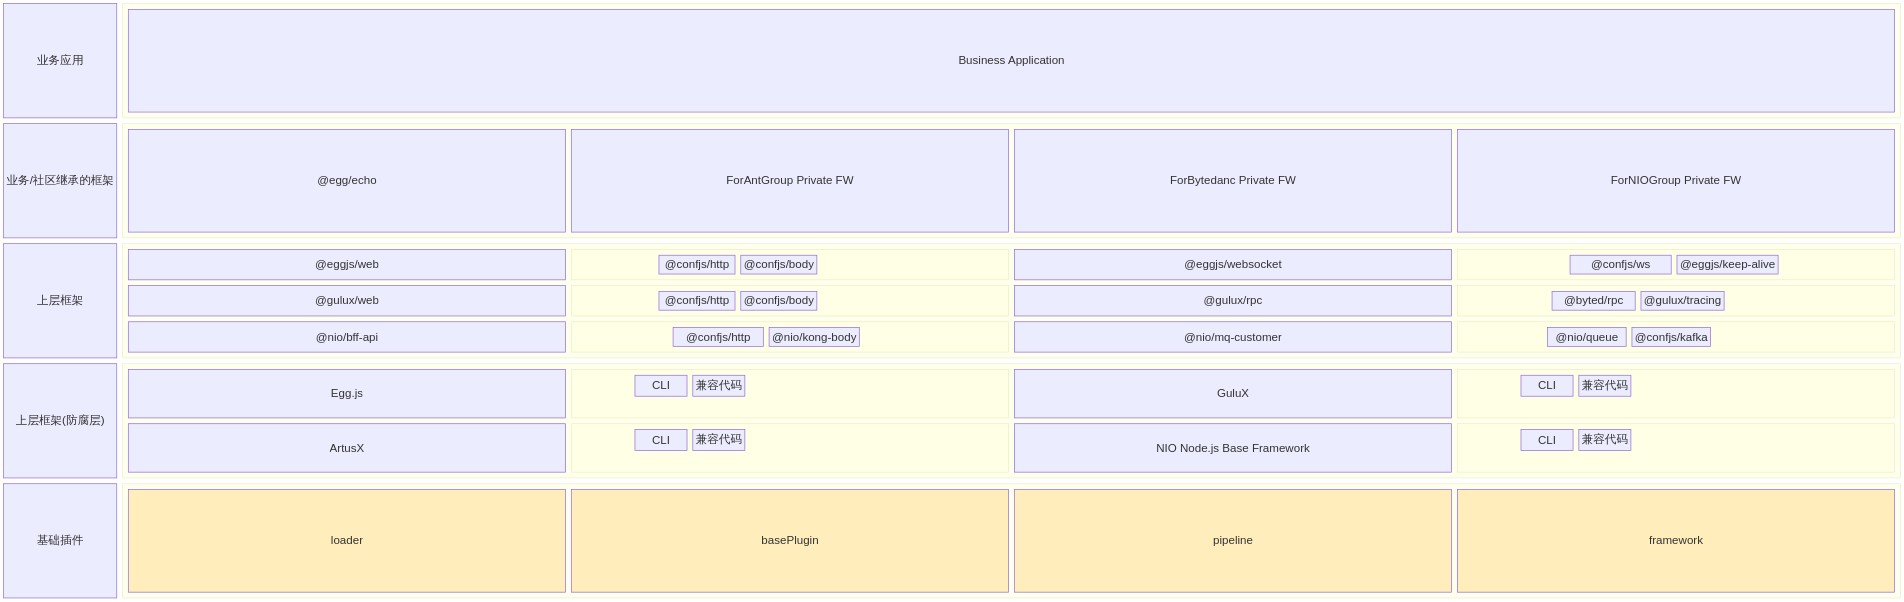
(上图仅用于表达相关组件的层级关系,与各商业公司的基础设施和具体实现无关)
## 设计理念
在已有的大规模 Node.js 应用实践中会发现,跨团队/部门间往往会存在一些相似的基建 SDK 与通用逻辑集合,仅依靠一个个离散的 npm 包级别的封装难以进行有效的应用治理。
因此会天然存在需求:需要有对应的设计对这些通用逻辑集合进行存放和统一的管理。这样,一个不具备框架级别复用能力的框架本身就无法在大规模的 Node.js 应用中铺开。
既能进行统一的通用逻辑治理,又能满足各个业务团队本地化定制的需求,面向框架的框架设计应运而生。
## 架构分层
参照 OOP 语言的继承,将框架设计立体化,垂直的继承链路可以很方便处理不同的业务团队对通用逻辑集合的存放和统一的管理需求。
由于通用逻辑集合本身往往是一组封装好的原子 npm 模块,因此框架的继承又会有别于 OOP 语言的继承:可以将多个业务上平级的框架各自管理的通用逻辑集合进行合并。
最后需要在垂直的框架继承链路之外增加水平的框架切面插槽,满足进一步的扩展需求。
因此根据职能边界,进行以下的结构分层
* `application`:应用,具备独立部署且提供完整能力的最小单位
* `plugin`:插件,对中间件缺失的应用生命周期通用能力的补充,也可以认为是对应用通用能力的扩展
* `framework`:框架,提供业务逻辑无关的一组基础能力透出,可以认为是一组插件的集合
其中`application`、`plugin` 和 `framework` 之间的关系如下:
```mermaid
flowchart LR
subgraph framework_base
direction TB
plugin_a
plugin_b
end
subgraph framework_core
direction TB
plugin_c
plugin_d
end
subgraph application_base
direction TB
plugin_e
plugin_f
end
framework_base --> framework_core --> application_base
```
`framework` 是一组插件能力的集合,仅提供如下能力:
* 一组插件的管理
* 通用配置
框架也可以通过继承的方式进行层层递进式扩展,另外需要通过切面的方式支持在 application 对任意垂直继承链路中的平级框架进行替换:
```mermaid
flowchart BT
subgraph framework [Framework 2]
direction TB
plugin_a
plugin_b
end
subgraph framework_1 [Framework 1-1]
direction TB
plugin_c
end
subgraph framework_2 [Framework 1]
direction TB
plugin_d
end
subgraph framework_3 [Framework 1-2]
direction TB
plugin_e
end
application([Application])
framework --> framework_1 -.- application
framework --> framework_2 --> application
framework --> framework_3 -.- application
```
垂直继承 + 水平切面插槽打造的立体化框架设计,即可从容面对千变万化的 Node.js 研发场景。
---
url: /core/2.loader.md
---
# 加载机制 Loader
```mermaid
flowchart LR
%% 定义三个虚线框子图(对应三个阶段)
subgraph FindPath
direction TB
A["ScanFolderFinder
implements
IPathFinder"]
B["ManifestFinder
implements
IPathFinder"]
end
subgraph Require
direction TB
C["Module(class)"]
D["Module(function)"]
end
subgraph Mount
direction TB
E["Singleton
Container"]
F["RequestContext
Container"]
end
%% 中间箭头与标注
A & B --> G["PathMap
(Manifest)"] --> C & D
%% 交叉箭头 + 标注
C -->|Set
By Metadata| E
C --> F
D --> E
D -->|Set
By Metadata| F
%% 样式配置(1:1 还原原图)
%% 子图虚线框
style FindPath fill:none,stroke:#333,stroke-width:1px,stroke-dasharray:5 5
style Require fill:none,stroke:#333,stroke-width:1px,stroke-dasharray:5 5
style Mount fill:none,stroke:#333,stroke-width:1px,stroke-dasharray:5 5
%% 节点样式(白色背景+黑边框)
style A fill:#fff,stroke:#333,stroke-width:1px
style B fill:#fff,stroke:#333,stroke-width:1px
style C fill:#fff,stroke:#333,stroke-width:1px
style D fill:#fff,stroke:#333,stroke-width:1px
style E fill:#fff,stroke:#333,stroke-width:1px
style F fill:#fff,stroke:#333,stroke-width:1px
style G fill:#fff,stroke:none
%% 箭头标注位置优化
linkStyle 4 labelPosition:0.5
linkStyle 7 labelPosition:0.5
```
> 从概念上看,Loader 更加侧重的是以编程约束规范来提升项目协作一致性体验,因此整体设计上不与请求模型中的 Context/Trigger/Middleware 做过深耦合。
Core 内置 Loader 实现,主要的环节包括:
* FindPath 扫描目录/读取 **Manifest**
* Require 加载模块并 attach 对应的 **Meta**
* Mount 将对象池交付并按照其上的 **Meta** 挂载到 Context/Application or IOC Contianer
其中,Manifest 用于描述目录、Path、MetaHandler 的关系,格式如下:
## 目录扫描/读取 Manifest
Core 中内置默认的目录扫描规范,优先级 CustomLoader -> Manifest -> 目录。
### 基于目录
* 以下路径属于内置于 Core 的加载部分
* config: `${rootDir}/config/config.${env}.ts`
* plugin: `${rootDir}/config/plugin.${env}.ts`
* extend:
* `${rootDir}/app/extend/application.ts`
* `${rootDir}/app/extend/context.ts`
* `${rootDir}/app/extend/request.ts`
* `${rootDir}/app/extend/helper.ts`
* 上层框架的协议实现可以补充加载路径,如:
* service: `${rootDir}/service/${name}.ts`
* controller: `${rootDir}/controller/${name}.ts`
* router: `${rootDir}/router/${name}.ts`
### 基于Manifest
`mainfest.json` 文件提供扁平化的文件路径,提供给 loader 加载。
以 HTTP 框架中的常见 Case 为例:
```ts title="iTerm"
{
"root": "/rootDir",
"items": [
{
"path": "src/app/service/user.ts",
"type": "service"
},
{
"path": "src/app/controller/user.ts",
"type": "controller"
},
{
"path": "src/app/middleware/auth.ts",
"type": "middleware"
},
{
"path": "src/app/extend/helper.ts",
"type": "extend"
},
{
"path": "src/app/config/config.${env}.ts",
"type": "config"
}
]
}
```
### CustomLoader
```ts title="iTerm"
export default () => {
// customLoader
customLoader: {
directory: 'app/need_custom_loader',
inject: 'singleton' | 'execution' | 'transient',
// 是否加载框架和插件的目录
loadunit: false,
}
}
```
## 配置加载 Load Config
对于配置文件 `config.${env}.ts` 的加载,将根据服务的环境变量做如下处理。
* 默认约定配置文件为 `config.default.ts` ,默认环境变量 `ARTUS_SERVER_ENV` ,可以通过 hook 来定制相关的环境变量解析方式。
* 根据环境变量 `env` 来加载对应 `config.${env}.ts` 配置文件
* `config.${env}.ts` 将采用 [deepmerge](https://github.com/TehShrike/deepmerge) 的方式进行合并,值得注意的是对于数组项的合并,框架采用了直接替换的方式,因为数组元素之间往往存在顺序的要求,直接合并可能会导致与预期不符的结果。例如 环境变量为`ARTUS_SERVER_ENV=prod` ,`config.prod.ts` 将会覆盖并合并 `config.default.ts`
* config 支持异步,可通过异步函数来实现更加复杂的配置。由于 Artus 默认采用单进程模型,需要增强远程配置获取的前置能力,以便放置类似的异步配置加载逻辑。常见的异步获取远程配置有密钥管理服务 KMS(Key Management Service), 通过密钥来保护后台应用配置文件。
* 配置加载完毕后,需要 dump 出配置信息用于分析和排查
* \[TODO] 可以通过 setConfig API,在 config 加载完成后对 config 进行修改, 以便框架记录配置改动的操作位置,方便分析
```ts title="iTerm"
// 以 ARTUS_SERVER_ENV=prod 为例
// config.default.ts
// 下面的 Config 可以是 Object 或 Async Function
export default {
configA: 'configA',
mysql: {
host: 'localhost',
port: 3306,
password: '123456'
}
}
// config.prod.ts
export default {
configB: 'configB',
mysql: {
host: '10.12.13.14',
port: 3306,
password: 'asdfsadfcsadcasdfaasfdaf='
},
}
// 合并覆盖后的配置
{
"configA": "configA",
"configB": "configB",
"mysql": {
"host": "10.12.13.14",
"port": 3306,
"password": "asdfsadfcsadcasdfaasfdaf="
},
}
```
```ts title="iTerm"
// config.default.ts
// 支持使用函数及异步方式
export default async (appInfo, appConfig) => {
return {
url: appConfig.host + 'xxx',
asyncData: await Promise.resolve('async_data'),
// kms 解密配置
encryptedData: await kmsClient.decrypt('encrypted_text'),
};
};
```
`ARTUS_SERVER_ENV` 默认值枚举值如下
```ts title="iTerm"
enum ARTUS_SERVER_ENV {
DEV = 'development',
PROD = 'production',
DEFAULT = 'default',
}
```
* `default`: 默认值,即没有环境变量时默认读取的配置文件名 `config.default.ts`
* `development`: 本地开发环境,即 `ARTUS_SERVER_ENV=development` 时,将 `config.development.ts` 和 `config.default.ts` 进行 deepmerge 操作
* `production`: 某种意义上的生产环境,即 `ARTUS_SERVER_ENV=production` 时,将 `config.production.ts` 和 `config.default.ts` 进行 deepmerge 操作
## 模块/文件加载 Load Module / File
通过上一环节的目录扫描与读取,Loader 将能够持有一份标准化的入口文件 Path 列表(统称为 Manifest),Loader 需要针对该部分文件进行加载行为:
* 对于 JS / TS 文件,以模块的形式
* 其中,模块应包括 Meta 信息用于最终消费环节(如:Scope),有以下形式可用:
* JS 编程界面中通过预先配置的形式由上层框架指定
* TS 编程界面使用上层框架实现对应的装饰器,调用 Core 提供的接口使用 Reflect attach 上述信息到 Class
* 模块的加载应当兼容 CommonJS 和 ECMAScript Module
* 对于 JSON 等元信息文件,利用 Manifest 或 Loader 配置中的解析规则处理
POC 如下:
* 加载流程
```ts title="iTerm"
interface FileItemLoader {
loadFile() {}
}
class ModuleLoader implements FileItemLoader {
loadFile (path): Promise {
if (isESModule(path)) {
// 存在异步问题,可能影响 Loader 最终 API
return import(path);
}
return require(path);
}
}
class MetaFileLoader implements FileItemLoader {
loadFile (path) {
if (isJSON(path)) {
return JSON.parse(fs.readFileSync(path));
}
return null;
}
}
```
* Meta 信息挂载(JS)
* 按照目录约定的形式,Meta 由上层框架通过对 Loader 的预先配置指定
* Meta 信息挂载(TypeScript Decorator)
```ts title="iTerm"
// app/service/user.ts 用户代码
@Service(ScopeEnum.Application)
class UserService {
getInfo() {
return {
hello: 'world',
};
}
}
// decorator.ts 上层框架实现代码/Core 默认配置
export const Service = (scope: ScopeEnum) => (target) => {
attachReflectMetaData(target, {
namespace: 'sercice',
scope,
});
};
```
## 基于 IoC 的挂载机制
* Artus 中的 Core 实现底层基于 IoC(控制反转,Inversion of Control)实现,便于在上层框架中集成 DI(依赖注入,Dependency Injection)、AOP(面向切面编程,Aspect Oriented Programming)等特性
* 实现原理为:
* 在 Core 中按照 Scope 提供 IOC Container 作为基础对象池,Scope 包括
* Singleton(单例生命周期,全局执行一次实例化)
* Execution(执行生命周期,每次执行时实例化)
* Transient(临时生命周期,每次使用时实例化)
* Loader 及上层框架的 Cutsom Loader 应当在挂载环节中将加载的类对象
* 把 Controller 和 Service 等类的实例化创建过程托管给容器
* Config 配置内容托管给容器
* 插件中扩展的属性等也托管给容器,用户能够在 IoC 模式下注入这些扩展的属性
* 例如 Redis、MySQL Client
* 希望兼容现有 Egg/Gulu 中 app/ctx 等数据模型的前提下,提供 IoC 的开发模式
* 对于上层框架,暴露 IoC Container 的操作方法,用于实现 DI/AOP...
* 对于既有应用迁移,提供 delegate 代理层,模拟传统 app/ctx 用法,代理层的 getter/setter 访问 IoC Container
PoC 如下
* Container 容器伪代码
```js title="iTerm"
// container.js
class Container {
constructor() {
this.registry = new Map();
}
get(identifier) {
const clazz = this.registry.get(identifier);
const instance = new clazz();
// TODO: 处理注入的属性
return instance;
}
set(identifier, target) {
this.registry.set(identifier, target);
}
// 装饰器
inject(identifier) {
return (target, properName, index) => {};
}
// 装饰器
injectable() {
return (target) => {
// identifier 同时注册class 本身和类名两种形式
this.set(target, target);
this.set(target.name, target);
};
}
}
module.exports = new Container();
```
[lib/loader/file\_loader.js](https://github.com/eggjs/egg-core/blob/master/lib/loader/file_loader.js#L210)

[lib/loader/mixin/controller.js](https://github.com/eggjs/egg-core/blob/master/lib/loader/file_loader.js)

[lib/loader/context\_loader.js](https://github.com/eggjs/egg-core/blob/master/lib/loader/context_loader.js#L92)

* 以注入形式使用 IoC 托管的类实例(TypeScript)
```ts title="iTerm"
// src/app/controller/home.ts
import { Inject, Injectable } from '@artusjs/a-framework';
import { AnyService } from '../service/user';
@Injectable({
key: 'anyClassA' // Optionial
scope: ScopeEnum.Singleton,
namespace: 'controller'
})
export default class AnyClassA {
// 以下异步钩子会需要类似 getAsync 的异步函数进行操作
@Init()
async onInit() {
await init();
}
@Destroy()
async onDestroy() {
await destroy();
}
@Inject(AnyService, {
// Optionial
})
anyService: AnyService;
async anyMethod() {
return this.anyService.getInfo();
}
}
```
* 以传统模型使用 IoC 托管的类实例(JavaScript/代理层)
* 注:如有异步情况(getAsync)这种代理层可能不能完全向下兼容(需要 await)
* 对于代理层不能完全处理的情况(如:异步)需要在分析(构建时)或启动(运行时)给出 warning 提示
```js title="iTerm"
// src/app/controller/home.js
export default class AnyClassB {
async anyMethod() {
const anyClassA = ctx.service.anyClassA;
await anyClassA.onInit();
const result = anyClassA.anyMethod(); // or app.service(scope is application)
await anyClassA.onDestroy();
return result;
}
}
```
---
url: /core/3.plugin.md
---
# 插件 Plugin
## 插件能做什么
:::tip
Framework(Plugin) = Core + Custom Loader + Plugins
:::
在 `Application` 和 `Framework(Plugin)` 之外增加一层插件(`Plugin`)的抽象,主要是解决以下问题:
* 以可复用的方式对 `application` 进行通用能力扩展
* 完整介入 `application` 生命周期钩子
* 对请求模型中的 `pipeline` 引入的中间件顺序自定义
* 实现通用业务逻辑的复用或者对巨石型应用以逻辑插件粒度的拆分
## 目录结构
从插件定义中可以看到,它的能力决定了插件本质上就是 *Mini* `Application`,因此其目录组织结构和 `Application` 保持一致。
## 元信息
`Plugin` 同样会以 npm 模块的形式进行发布,但是与此同时它又会有别于通用的标准 npm 模块,反映为:
* 必须存在 `main` 或者 `exports` 入口,即直接 `require` 需要入口
* 入口文件同级存在 `meta.json` 文件用于描述插件元信息
下面是一个最简化的 `meta.json` 内容:
```json title="iTerm"
{
"name": "plugin-example"
}
```
* `name`: 在 Artus Core 中标记插件的真正名称,在插件列表中具有唯一性
## 依赖管理
`Plugin` 的依赖管理会分为两个部分:
* 依赖的标准 npm 模块
* 依赖的其余 `Plugin`
对于前者,这部分依赖会按照 npm 的通用依赖规则放到 `package.json` 的 `dependencies` / `devDependencies` 中;
对于后者,当前 `Plugin` 依赖的其余 `Plugin` 的时候,需要通过如下方式申明,以便扫描机制对其进行额外处理:
```json title="iTerm"
{
"name": "plugin-example",
"dependencies": [
{
"name": "plugin-a"
},
{
"name": "plugin-b",
"optional": true
}
]
}
```
* `dependencies`:数组,当前 `Plugin` 的前置依赖项列表
* `dependencies[i].name`: 字符串,前置依赖 `Plugin` 项目名称
* `dependencies[i].optional`: 布尔值,前置依赖 `Plugin` 项目是否可选,默认为 false
`Plugin` 之间的依赖顺序会于 Artus Core 中在启动前根据 `artusjsPlugin` 配置的 `dependencies` 进行计算,出现 `Plugin` 间的循环依赖需要抛出对应的错误。
## 开启关闭
插件虽然目录和 `Application` 保持一致,但是其自身不应当被允许直接部署或者执行,因此 `Plugin` 的开启和关闭管理应当置于 `Application` / `Framework` 中进行。
插件的启停管理配置位于 `${application/framework}/config/plugin[.${env}].[js|ts]` 中:
```ts title="iTerm"
export default {
// inline plugin
foo: {
enable: true,
path: path.join(__dirname, '../plugins/foo'),
},
// npm plugin
bar: {
enable: true,
package: '@artusjs/plugin-bar',
},
};
```
* 配置名称应当和对应 `Plugin` 中 `meta.json` 里的 `name` 一致,Artus Core 需要对此处进行校验,不一致则抛错
* `enable`: Boolean,是否启用此插件
* `path`: 渐进式开发中的内联插件,此配置为内联插件的具体绝对路径,配置此项后 `package` 不再生效
* `package`: 独立 npm 包形式引入的插件对应的 npm 包名
## 支持多级别的 API 可见性
在 `meta.json` 中添加 `type` 标识插件类型:
```json title="iTerm"
{
"name": "plugin-example",
"dependencies": [
{
"name": "plugin-a"
},
{
"name": "plugin-b",
"optional": true
}
],
"type": "simple"
}
```
根据插件职能边界,提供两种插件类型:
* simple: 对应基础工具、中间件的简单封装,例如:`@artusjs/redis`
* module: 对应完整的 Mini Application,提供业务逻辑的复用或者巨型应用模块拆分
插件使用提供的不同级别 API 注入方法:
* private: 仅允许本插件内部使用
* internal: 仅允许插件之间调用
* public: 面向开发者使用
以下是使用样例:
```ts title="iTerm"
// src/app/service/any.ts
import { Inject, Injectable, ScopeEnum } from '@artusjs/core';
@Injectable({
scope: ScopeEnum.Execution,
namespace: 'service'
});
export default class AnyService {
async someMethod() {
}
}
```
```js title="iTerm"
// app.js
const { PluginBase } = require('@artusjs/core');
const AnyService = require('src/app/service/any');
module.exports = class AnyPlugin extends PluginBase {
constructor(app) {
this.app = app;
}
async willReady() {
this.registerApi(AnyService, {
visibility: 'private',
scope: 'execution',
namespace: 'service',
});
}
};
```
// TODO: 增加 plugin type 为 module 时(即插件为完整的业务复用逻辑模块)针对模块自身的元信息描述
## 生命周期
Core 中应有一套生命周期钩子管理机制
* Core 通过内置的生命周期列表维护一个 hookList
* Hook 应当支持异步行为,允许返回 Promise 或同步返回量
* 生命周期需要可以提供一个工具方法来进行分析
* 提供 Meta + Timestamp
* 日志需要友好
* 方便追溯
* 提供 insertHook 方法,用于框架基础插件中增加自定义的生命周期
* 提供 registerHook 方法,用于增加对应的生命周期处理函数
* 注册动作应当有序,Core 将依照注册顺序调用之
* 自定义钩子需要在 insert 后再 register,否则直接跑错,避免预期外效果,
* 提供 emitHook 方法,用于在特定时间点触发生命周期处理
* 内置的生命周期将由 Core 负责触发
* 自定义的生命周期需由对应调用 insertHook 的插件在内置钩子的处理器中予以 emit
其中,Artus 规范内置的生命周期事件包括:
* **configWillLoad** 配置文件即将加载,这是最后动态修改配置的时机
* **configDidLoad** 配置文件加载完成
* **didLoad** 文件加载完成
* **willReady** 插件启动完毕
* **didReady** 应用启动完成
* **beforeClose** 应用即将关闭
TODO: 补充 Plugin 的加载和卸载对应的生命周期钩子
## 启动流程
```mermaid
flowchart TD
%% 主流程节点定义
A["加载插件"] --> B["configWillLoad"]
B --> C["加载配置"]
C --> D["configDidLoad"]
D --> E["框架自定义加载逻辑
(协议实现加载)"]
E --> F["didLoad"]
F --> G["启动"]
G -->|协议实现的插件
调用emit| H["willReady"]
G --> I["didReady"]
I --> L(( ))
L --> M["beforeClose"]
%% 自定义钩子分支(虚线)
I -.-> J["自定义钩子逻辑
(In Plugin)"]
J -.->|insertHook + emitHook| K["customHook"]
K -.-> L
%% 样式配置(还原原图黄/蓝配色+圆角)
style A fill:#fff380,stroke:#ff0000,stroke-width:2px,rx:20,ry:20
style C fill:#fff380,stroke:#ff0000,stroke-width:2px,rx:20,ry:20
style E fill:#fff380,stroke:#ff0000,stroke-width:2px,rx:20,ry:20
style J fill:#fff380,stroke:#ff0000,stroke-width:2px,rx:20,ry:20
style B fill:#b3d8ff,stroke:#000000,stroke-width:1px,rx:5,ry:5
style D fill:#b3d8ff,stroke:#000000,stroke-width:1px,rx:5,ry:5
style F fill:#b3d8ff,stroke:#000000,stroke-width:1px,rx:5,ry:5
style H fill:#b3d8ff,stroke:#000000,stroke-width:1px,rx:5,ry:5
style I fill:#b3d8ff,stroke:#000000,stroke-width:1px,rx:5,ry:5
style K fill:#b3d8ff,stroke:#000000,stroke-width:1px,rx:5,ry:5
style M fill:#b3d8ff,stroke:#000000,stroke-width:1px,rx:5,ry:5
style G fill:#ffffff,stroke:#000000,stroke-width:2px
style L fill:#000000,stroke:#ff0000,stroke-width:2px
```
注:上图中自定义钩子逻辑仅为示意,可在任意 hook 位置启动这一机制
---
url: /core/4.pipeline.md
---
# 请求处理机制 Pipeline
Artus 作为底层 Core 规范,具备协议无关特性,请求处理模型基于洋葱模型和 Context 构建,但不具备协议相关的概念。上层框架可基于以下模型,构建出适用于特定协议的实现(如:HTTP/1.1, HTTP/2, QUIC, HTTP/3, WebSocket, Timer, MQ, gRPC, etc...)。
## 交互模型统一
对于可以抽象成 C/S 交互的场景:
* 请求 - 响应模型
* 单独的请求模型(无响应)
* 单独的响应模型(无请求)
* 单次请求 - 多次响应模型
以上交互场景其实可以进一步抽象为:
1. 逻辑触发
2. 逻辑执行
即便对于定时任务和消息队列这些不具备典型 C/S 交互的场景,可以看到本质上仍然是 触发 - 执行 顺序。
## 触发机制及概念
综上,基于这些公共特征,以及流水线式的逻辑处理天然有统一的切面处理能力,Artus 的请求处理模型规定如下:
* 抽象 BaseContext
* HttpContext / RpcContext / WebSocketContext / TimerContext 可以根据场景自行扩展
* 抽象 BasePipeline + 洋葱中间件驱动
* Pipeline 作为中间件入口触发器,不同协议可以自行扩展加一些定制信息
如下图可以展示根据上述设计的框架内核驱动一次任务流程:

其中,洋葱模型的结构如下:

这里的 `BasePipeline` 基类,作为任务流程的触发点,不同的协议场景下可以根据自身进行扩展。
Pipeline 构造函数初始化时,会根据参数进行如下操作:
* \[必须]初始化 Execution(extends BaseExecution)
* \[可选]初始化 Request(extends BaseRequest),针对需要处理请求参数的场景
* \[可选]初始化 Response(extends BaseResponse),针对需要进行响应的场景
初始化完成后,开始进入洋葱中间件模型进行统一的中间件和用户编写业务逻辑中进行处理,最后根据场景选择是否返回响应。
```ts title="iTerm"
const main = async () => {
const pipeline = new Pipeline();
pipeline.use([
async function (_: Context, next: Next): Promise {
await next();
throw new Error('mock error');
},
async function (ctx: Context): Promise {
const { data } = ctx.output;
data.set('responseValue', 1);
},
]);
const ctx = new Context();
let error = '';
try {
await pipeline.run(ctx);
} catch (err: any) {
error = err.message;
}
assert(error === 'mock error');
};
```
对于例如 `runInBackground` 的异步场景,应由上层框架拆分为两次 Pipeline Execution
TODO: 上述拆分行为需要 POC 验证
TODO: Pipeline 需要提供追溯和分析的能力。
---
url: /core/5.exception.md
---
# 异常处理 Exception
**Artus** 要求各上层框架使用 `@artus/core` 提供的能力,实现如下规定的异常机制。同时要求上层框架生态系统中的插件/扩展,使用这一机制统一抛出错误。
预期可对**满足 Artus 规范的上层框架**中产生的异常构建全链路的**发现**与**用户自检**机制
## 错误码 ErrorCode
异常应当按照如下格式编制错误码,并在链路中使用错误码进行抛出和捕获
* `[NAMESPACE:]ERROR_CODE`
* 仅包括大写字母、数字 和 `_`
* NAMESPACE 为 `CORE` 的是 Artus 通用异常,上层框架不应使用,其详细内容见附录 1
* 不包括 NAMESPACE 的错误码用于业务代码自定义异常,框架及生态插件不应使用
* 所有未经 Artus 管理的 `Error` 默认具有错误码 `CORE:UNKNOWN`
* Artus 通用异常,未找到配置文件:`CORE:NO_CONFIGURATION`
* Gulu 框架中的 IO 超时异常:`GULU:IO_TIMEOUT`
* @gulu/redis 插件中的连接池为空异常:`GULU_REDIS:POOL_EMPTY`
* 业务代码中抛出的下游异常:`BIZA_FETCH_PLATFORM_FAIL`
错误码及对应描述应当在发布的 npm 包被按如下格式的 JSON 文件中被编制:
注:描述字段支持使用对象格式声明 i18n,Language Code 使用 [ISO639-1:2002](https://www.loc.gov/standards/iso639-2/php/code_list.php),其中 `en` 是默认值
```json title="iTerm"
// ./exception.json
{
"GULU:IO_TIMEOUT": {
"desc": "IO 处理超时"
},
"GULU:ADDRESS_USED": {
"desc": {
"zh": "待监听地址已被占用。",
"en": "Listen address already in use."
},
"detailUrl": "https://www.bytedance.com"
}
}
```
该文件将被 @artus/core 读取用于格式化异常
上层框架可通过插件树取得合并后的错误码表,用于自身的上报/自检平台建设
## 错误实体 StdError
```ts title="iTerm"
class ArtusStdError extends Error {
name: string = 'ArtusStdError';
_code: string;
constructor(code: string) {
super(
`[${code}] This is Artus standard error, Please check on https://github.com/artusjs/spec`
);
this._code = code;
}
get code(): string {
return this._code;
}
get desc(): string {
return ErrorCodeUtils.getI18NDesc(ErrorCodeMap[this._code]);
}
get detailUrl(): string | undefined {
return ErrorCodeMap[this._code]?.detailUrl;
}
}
```
## 抛出 Throw
用户可通过直接 `throw` 的形式抛出 ArtusStdError,如:
```ts title="iTerm"
throw new ArtusStdError('ARTUS:TEST_EXCEPTION');
```
也可通过包装的形式:
```ts title="iTerm"
class TestException extends ArtusStdError {
static code = 'ARTUS:TEST_EXCEPTION';
name = 'TestException';
constructor() {
super(TestException.code);
}
}
throw new TestException();
```
注意包装类中需要包括一个名为 `code` 的 static property,这一属性将用于 ExceptionFilter 机制中 `@Catch()` 装饰器的加速匹配(基于错误码)
上层框架/ Artus WG 亦可提供工具链用于基于错误码声明机制,生成 Exception 类的 TS.
## 捕获 Catch
工程中产生的所有未被用户主动 Catch 的异常,均应被框架 catch,并按各自诉求上报和打点(可观测性特性,社区版本提供基于 *OpenTelemetry* 的实现)。
同时,用户可通过 `ExceptionFilter` 机制处理**执行过程中的异常**(注意:生命周期中的异常应当显式处理或框架统一 Catch,不在 Filter 处理范围内),并支持向终端用户响应该错误。
其中,公共的错误处理器可被这样声明:
```ts title="iTerm"
import { Catch, ExceptionFilterType, ArtusStdError, Inject, Logger } from '@artusjs/core';
import { HTTPResponse } from '@artusjs/http';
@Catch() // Equal to @Injectable({ id: ExceptionFilter })
export default class MyExceptionFilter implments ExceptionFilterType {
@Inject()
logger: Logger;
@Inject()
res: HTTPResponse;
async catch(err: Error): Promise {
if (err instanceof ArtusStdError) {
this.logger.error('MyExceptionFilter has catch a Artus Standard Error, code is ' + err.code);
} else {
this.logger.error('MyExceptionFilter has catch a Non-Standard Error, type is ' + err.name + ', Message: ' + err.message);
}
res.status = 500;
res.write(JSON.stringify({
code: err.code,
errMsg: err.message
}));
res.end();
}
}
```
同时提供语法糖用于处理特定类别异常,如:
```ts title="iTerm"
import { Catch, ExceptionFilterType, ArtusStdError, Inject, Logger } from '@artus/core';
import { HTTPResponse } from '@artus/http';
@Catch('GULU:IO_TIMEOUT') // Or @Catch(MyCustomError)
export default class MyTimeoutExceptionFilter implments ExceptionFilterType {
@Inject()
logger: Logger;
async catch(err: Error): Promise {
this.logger.error('MyExceptionFilter has catch Timeout Error of Gulu');
}
}
```
值得注意的是:
* 全局性质的 `ExceptionFilter`(`@Catch()` 无参数)全局唯一,多次声明会覆盖
* 针对特定异常的 `ExceptionFilter` 针对单个异常需唯一,多次声明会覆盖
* 实现时仍基于 Trigger 的中间件序列来实现捕获,限制会是:
* 不能处理 `Singleton` 作用域中的异常,它们应当被显式 `try-catch`
* 其他框架或应用中定义的中间件如试图 catch 错误,需继续 throw 才能走到 `ExceptionFilter` 中
---
url: /core/v1/4.framework.md
---
# 框架 Framework
:::warning
框架概念在 2.x 中废弃,由 Plugin 继承,替代框架概念。
:::
## 框架和 Core 的关系
> Framework = Core + Custom Loader + Plugins
## 框架包含哪些核心类
* Application:对 Core 的继承和进一步实现
```ts
class Application extends Core {
// 指定 Loader
get [APP_LOADER](): Loader {
return CustomLoader;
}
}
```
* Loader:自定义 Loader 实现
TODO: 需要与 Loader 部分对齐 API
```ts title="iTerm"
class CustomLoader {
/**
* 加载插件配置 和 应用配置
*/
loadConfig(): void {}
/**
* 执行加载
*/
load(): void {}
}
```
## 生命周期
Core 中应有一套生命周期钩子管理机制
* Core 通过内置的生命周期列表维护一个 hookList
* Hook 应当支持异步行为,允许返回 Promise 或同步返回量
* 生命周期需要可以提供一个工具方法来进行分析
* 提供 Meta + Timestamp
* 日志需要友好
* 方便追溯
* 提供 insertHook 方法,用于框架基础插件中增加自定义的生命周期
* 提供 registerHook 方法,用于增加对应的生命周期处理函数
* 注册动作应当有序,Core 将依照注册顺序调用之
* 自定义钩子需要在 insert 后再 register,否则直接跑错,避免预期外效果,
* 提供 emitHook 方法,用于在特定时间点触发生命周期处理
* 内置的生命周期将由 Core 负责触发
* 自定义的生命周期需由对应调用 insertHook 的插件在内置钩子的处理器中予以 emit
其中,Artus 规范内置的生命周期事件包括:
* **configWillLoad** 配置文件即将加载,这是最后动态修改配置的时机
* **configDidLoad** 配置文件加载完成
* **didLoad** 文件加载完成
* **willReady** 插件启动完毕
* **didReady** 应用启动完成
* **beforeClose** 应用即将关闭
TODO: 补充 Plugin 的加载和卸载对应的生命周期钩子
## 启动流程

注:上图中自定义钩子逻辑仅为示意,可在任意 hook 位置启动这一机制
---
url: /core/v1/5.trigger.md
---
# 请求处理机制 Trigger
:::warning
Trigger 在 2.x 中废弃,由 Pipeline 代替。
:::
Artus 作为底层 Core 规范,具备协议无关特性,请求处理模型基于洋葱模型和 Context 构建,但不具备协议相关的概念。上层框架可基于以下模型,构建出适用于特定协议的实现(如:HTTP/1.1, HTTP/2, QUIC, HTTP/3, WebSocket, Timer, MQ, gRPC, etc...)。
## 交互模型统一
对于可以抽象成 C/S 交互的场景:
* 请求 - 响应模型
* 单独的请求模型(无响应)
* 单独的响应模型(无请求)
* 单次请求 - 多次响应模型
以上交互场景其实可以进一步抽象为:
1. 逻辑触发
2. 逻辑执行
即便对于定时任务和消息队列这些不具备典型 C/S 交互的场景,可以看到本质上仍然是 触发 - 执行 顺序。
## 触发机制及概念
综上,基于这些公共特征,以及流水线式的逻辑处理天然有统一的切面处理能力,Artus 的请求处理模型规定如下:
* 抽象 BaseContext
* HttpContext / RpcContext / WebSocketContext / TimerContext 可以根据场景自行扩展
* 抽象 BaseTrigger + 洋葱中间件驱动
* Trigger 作为中间件入口触发器,不同协议可以自行扩展加一些定制信息
如下图可以展示根据上述设计的框架内核驱动一次任务流程:

其中,洋葱模型的结构如下:

这里的 `BaseTrigger` 基类,作为任务流程的触发点,不同的协议场景下可以根据自身进行扩展。
Trigger 构造函数初始化时,会根据参数进行如下操作:
* \[必须]初始化 Execution(extends BaseExecution)
* \[可选]初始化 Request(extends BaseRequest),针对需要处理请求参数的场景
* \[可选]初始化 Response(extends BaseResponse),针对需要进行响应的场景
初始化完成后,开始进入洋葱中间件模型进行统一的中间件和用户编写业务逻辑中进行处理,最后根据场景选择是否返回响应。
对于例如 `runInBackground` 的异步场景,应由上层框架拆分为两次 Pipeline Execution
TODO: 上述拆分行为需要 POC 验证
TODO: Pipeline 需要提供追溯和分析的能力。
---
url: /ecosystem/artus-cli/1.quickstart.md
---
# 快速开始
## 目录结构
跟 Artus 的应用一样,除了 config 目录的约定之外,其他原则上不约束目录结构,但是我们也会有一些推荐的规范( 比如入口文件统一放到 bin 目录下,指令文件统一放到 cmd 目录下 ),比如 simple-bin
> 如果不想分那么多目录或文件也可以参考 [singlefile](https://github.com/artus-cli/examples/tree/master/singlefile) 例子的单文件结构
```bash title="iTerm"
simple-bin
├── bin
│ └── cli.ts 入口文件
├── cmd
│ └── main.ts 主命令
└── package.json 描述文件
```
simple-bin 中只有一个指令,如果存在多个指令的情况,也可以参考 egg-bin 的目录结构:
```bash title="iTerm"
egg-bin
├── bin
│ └── cli.ts
├── cmd
│ ├── cov.ts
│ ├── debug.ts
│ ├── dev.ts
│ ├── main.ts
│ └── test.ts
├── config
│ ├── framework.ts
│ └── plugin.ts
├── index.ts
├── meta.json
└── package.json
```
## 入口文件
CLI 的可执行文件,只要引入 `@artus-cli/artus-cli` 的 `start` 方法并且执行即可,一般定义在项目的 bin 目录中。
```ts title="bin/cli.ts"
#!/usr/bin/env node
import { start } from '@artus-cli/artus-cli';
start({
// 你的 bin 名称,没传默认是 package.json 里的 name
// 如果 bin 中有配置也会默认选 bin 配置中的第一个
binName: 'my-bin',
// 指令所在目录,比如代码目录在项目根目录下的 src 目录,cli.ts 在 src/bin/ 中,那么就可以配 path.dirname(__dirname)
// 如果不配,会自动找 package.json 所在目录
// baseDir: path.dirname(__dirname),
});
```
## 定义指令
### DefineCommand
通过 `DefineCommand` 这个装饰器可以定义一个指令。
```ts title="index.ts"
import { DefineCommand, Command } from '@artus-cli/artus-cli';
@DefineCommand()
export class MyCommand extends Command {
async run() {
console.info('trigger me');
}
}
```
如果 `DefineCommand` 不传 command ,那么该指令会自动设置为主指令,比如上面的例子的 bin 名称是叫 my-bin,那么直接在命令行执行 my-bin 就会打印 `trigger me` 。
### Option
可以通过 `Option` 装饰器定义参数:
```ts title="index.ts"
import { DefineCommand, Option, Command } from '@artus-cli/artus-cli';
@DefineCommand()
export class MyCommand extends Command {
@Option({
// flag 别名,比如 -p
alias: 'p',
// flag 默认值
default: 3000,
// flag 描述,会打印在 -h 信息中
description: 'port',
})
port: number;
async run() {
console.info('Run with port', this.port);
}
}
```
此时再执行 `my-bin` 将会打印 `Run with port 3000` ,因为 `port` 默认是 3000 ,也可以指定执行 `my-bin --port=7001` 或者 `my-bin -p 7001`
### 综合使用
上面的例子中的 `DefineCommand` 也可以传入 command 指定执行参数以及描述:
```ts title="index.ts"
import { DefineCommand, Option, Command } from '@artus-cli/artus-cli';
@DefineCommand({
// $0 代表指令名的占位符,建议统一用 $0
// 这里的几种写法:'my-bin [baseDir]' 或者 '$0 [baseDir]' 再或者 '[baseDir]' 效果是一样的
command: '$0 [baseDir]',
// 指令描述,非必需,会打印在 -h 信息中
description: 'My First Bin',
// 指令使用示例,非必须,会打印在 -h 信息中
examples: [
// 第一个参数是指令例子,第二个参数是对当前指令例子的注释( 格式 yargs 的规范一致 ),其中 `$0` 会被自动替换成指令名
['$0 ./', 'Run in base dir'],
],
})
export class MyCommand extends Command {
@Option({
alias: 'p',
default: 3000,
description: 'port',
})
port: number;
@Option()
baseDir: string;
async run() {
console.info('Run with port %s in %s', this.port, this.baseDir);
}
}
```
当执行 `my-bin ./src --port=7001` 即可打印 `Run with port 7001 in ./src`
## 定义子指令
### 常规用法
定义子指令也是通过 `DefineCommand` 这个装饰器,比如上面的例子改成一个 dev 的子指令,只需要改一下 command 即可:
```ts title="dev.ts"
import { DefineCommand, Option, Command } from '@artus-cli/artus-cli';
@DefineCommand({
command: 'dev [baseDir]',
description: 'Run Dev Server',
alias: 'd',
})
export class MyDevCommand extends Command {
@Option({
alias: 'p',
default: 3000,
description: 'port',
})
port: number;
@Option()
baseDir: string;
async run() {
console.info('Run with port %s in %s', this.port, this.baseDir);
}
}
```
然后执行 `my-bin dev ./src --port=7001` 或者 `my-bin d ./src --port=7001` 即可 ,如果需要定义更多子指令也可以使用同样的配置方式,比如
```ts title="test.ts"
import { DefineCommand, Command } from '@artus-cli/artus-cli';
@DefineCommand({
command: 'test',
description: 'Run Unittest',
alias: 't',
})
export class MyTestCommand extends Command {
async run() {
console.info('Run Unittest');
}
}
```
当定义 command 的时候,上面例子中的 bin 名称( 即 my-bin )也可以省略,比如上面的例子可以精简成以下写法:
```ts title="test.ts"
import { DefineCommand, DefineOption, Command } from '@artus-cli/artus-cli';
@DefineCommand({
command: 'test',
description: 'Run Unittest',
alias: 't',
})
export class MyTestCommand extends Command {
async run() {
console.info('Run Unittest');
}
}
```
定义好之后就可以执行 `my-bin test` 看到效果。
### 指定父指令
常规用法中的父子关系,是通过解析 command 字符串支持的,在定义 Command 的时候也可以通过配置 parent 主动指定父指令。比如
```ts title="VSCode"
@DefineCommand({
command: 'module',
description: 'Module Commands',
})
export class ModuleMainCommand extends Command {
async run() {
console.info('module is run');
}
}
@DefineCommand({
command: 'dev',
description: 'Module Dev Commands',
parent: ModuleMainCommand,
})
export class ModuleDevCommand extends Command {
async run() {
console.info('module dev');
}
}
@DefineCommand({
command: 'debug',
description: 'Module Debug Commands',
parent: ModuleMainCommand,
})
export class ModuleDebugCommand extends Command {
async run() {
console.info('module debug');
}
}
```
然后就可以有了以下三个指令:
* `my-bin module`
* `my-bin module dev`
* `my-bin module debug`
就不用挨个写 `module dev` 和 `module debug`
> 使用场景:比如已经有一个 DevCommand ,需要在 module 这个父指令下也有一个 dev 指令,就可以新增一个 ModuleDevCommand 继承 DevCommand ,只需要配置 parent 为 ModuleCommand 即可 。
## Arguments
配置在 `DefineCommand` 的 command 参数中,两种配置方式
* `` 必传参数,比如 `command: 'test '`
* `[options]` 可选参数,比如 `command: 'dev [baseDir]'`
也可以配置动态参数
* `` 必传的动态参数,比如 `command: 'test '` ,最终拿到的 files 将是个数组。
* `[options...]` 可选动态参数,跟上面效果一样。
## Option
Option 是 Arguments 与 Flags(`--port` 这种参数) 的统一配置,通过 `Option` 装饰器定义
```ts title="VSCode"
export interface OptionProps {
alias?: string | string[]; // 别名
default?: any; // 默认值
required?: boolean; // 是否必须
description?: string; // 描述
}
```
当配置以下格式时
```ts title="VSCode"
@DefineCommand()
export class DevCommand extends Command {
// 可以传入详细配置
@Option({
alias: 'p',
description: 'port',
})
port: number;
// 传入字符代表 description
@Option('daemon')
daemon: boolean;
@Option('node flags')
nodeFlags: string;
}
```
执行指令可传入 `--port=7001 --node-flags=--inspect --daemon`
转换成在 run 函数中获取的 options 为
```json title="VSCode"
{
"port": 7001,
"nodeFlags": "--inspect",
"daemon": true
}
```
> * 如果是 boolean 类型,当传参为 `--no-daemon` 等同于 `--daemon=false` 。
> * Arguments 的详细配置也可以在其中配置,但只支持配置 `type` 与 `default` 两个属性。
## 中间件
分成几种中间件:
* 触发器中间件( 由 artus/pipeline 提供的 pipeline middlewares )
* 跟指令绑定的中间件
* 跟指令类绑定的中间件( command middlewares )
* 跟 run 函数绑定的中间件( method middlewares )
执行流水大概如下
```bash title="iTerm"
# 输入
input -> pipeline middlewares -> command middlewares -> method middlewares -> run
# 输出
run -> method middlewares -> command middlewares -> pipeline middlewares -> output
```
### 触发器中间件
在生命周期中注入 `@artus-cli/artus-cli` 的 Program ,然后调用 `use` 函数即可。这类型的中间件一般是用于全局或者针对性拦截一些指令输入。
> `Program` 是框架提供的一些开放 API ,可以用于获取指令列表,注册中间件,注册全局 Option 等,后面高级功能有介绍。
```ts title="lifecycle.ts"
import {
Inject,
ApplicationLifecycle,
LifecycleHook,
LifecycleHookUnit,
CommandContext,
Program,
CommandContext,
} from '@artus-cli/artus-cli';
@LifecycleHookUnit()
export default class UsageLifecycle implements ApplicationLifecycle {
@Inject()
private readonly program: Program;
@LifecycleHook()
async didLoad() {
this.program.use(async (ctx: CommandContext, next) => {
// do something
await next();
});
}
}
```
> 使用场景:比如 [plugin-help](https://github.com/artus-cli/plugin-help) 中就通过中间件拦截了 `--help` 和 `-h` 的输入,然后重定向到 help 指令。
### 指令中间件
通过 Middleware 装饰器可以定义指令中间件,可以使用在指令类或者 run 函数中,比如下面的例子
```ts title="VSCode"
import { DefineCommand, Command, Middleware } from '@artus-cli/artus-cli';
@DefineCommand({
command: 'dev',
description: 'Run the development server',
})
@Middleware(async (_ctx, next) => {
console.info('prerun 1');
await next();
console.info('postrun 1');
})
export class DevCommand extends Command {
@Middleware(async (_ctx, next) => {
console.info('prerun 2');
await next();
console.info('postrun 2');
})
async run() {
// nothing
}
}
```
输出结果为
```bash title="iTerm"
prerun 1
prerun 2
postrun 2
postrun 1
```
中间件也可以传数组,再比如下面这个例子
```ts title="VSCode"
import { DefineCommand, Command, Middleware } from '@artus-cli/artus-cli';
@DefineCommand({
command: 'dev',
description: 'Run the development server',
})
@Middleware([
async (_ctx, next) => {
console.info('prerun 1');
await next();
console.info('postrun 1');
},
async (_ctx, next) => {
console.info('prerun 2');
await next();
console.info('postrun 2');
},
])
export class DevCommand extends Command {
@Middleware([
async (_ctx, next) => {
console.info('prerun 3');
await next();
console.info('postrun 3');
},
async (_ctx, next) => {
console.info('prerun 4');
await next();
console.info('postrun 4');
},
])
async run() {
// nothing
}
}
```
输出内容为
```bash title="iTerm"
prerun 1
prerun 2
prerun 3
prerun 4
postrun 4
postrun 3
postrun 2
postrun 1
```
## 指令继承
直接使用类的继承方式即可。
### 配置继承
当指令继承时,子指令类会继承父指令类定义的配置信息,比如下面的例子
```ts title="iTerm"
// dev command
@DefineCommand({
command: 'dev',
})
export class DevCommand extends Command {
@Option({
alias: 'p',
default: 3000,
})
port: number;
async run() {
console.info('Run In', this.port);
}
}
// debug command
@DefineCommand({
command: 'debug',
})
export class DebugCommand extends DevCommand {
@Option({
default: 8080,
description: 'inspect port',
})
inspectPort: number;
async run() {
super.run();
console.info('Debug In', this.inspectPort);
}
}
```
执行 `my-bin debug` 的话,会输出
```bash title="iTerm"
Run In 3000
Debug In 8080
```
### 中间件继承
除了上面说的指令配置会自动继承之外,在类上挂载的中间件也能够被继承,还是继续看例子:
```ts
// dev command
@DefineCommand({
command: 'dev',
})
@Middleware(async (_ctx, next) => {
console.info('dev prerun 1');
await next();
console.info('dev postrun 1');
})
export class DevCommand extends Command {
@Middleware(async (_ctx, next) => {
console.info('dev prerun 2');
await next();
console.info('dev postrun 2');
})
async run() {
// nothing
}
}
// debug command
@DefineCommand({
command: 'debug',
})
@Middleware(async (_ctx, next) => {
console.info('debug prerun 1');
await next();
console.info('debug postrun 1');
})
export class DebugCommand extends DevCommand {
@Middleware(async (_ctx, next) => {
console.info('debug prerun 2');
await next();
console.info('debug postrun 2');
})
async run() {
super.run();
}
}
```
执行 `my-bin debug` 后会输出
```bash title="iTerm"
# ----- 指令执行开始 ----
dev prerun 1 # --> DevCommand>class_middleware
debug prerun 1 # --> DebugCommand>class_middleware
# ----- run() 执行开始 ----
debug prerun 2 # --> DebugCommand>run_middleware
# ----- super.run() 执行开始 ----
dev prerun 2 # --> DevCommand>run_middleware
dev postrun 2 # --> DevCommand>run_middleware
# ----- super.run() 执行结束 ----
debug postrun 2 # --> DebugCommand>run_middleware
# ----- run() 执行结束 ----
debug postrun 1 # --> DebugCommand>run_middleware
dev postrun 1 # --> DevCommand>run_middleware
# ----- 指令执行结束 ----
```
这里分两种情况:
* 一种是绑定在类上的中间件,会直接合并:
* 比如 Dev 定义的类中间件是 A ,Debug 定义的类中间件是 B ,那么在 Debug 中的类中间件列表会组合成 `[ A, B ]`。
* 另一种是绑定在 `run` 函数的中间件,当在 DebugCommand 的 `run` 函数中调用 `super.run` 的时候,就会执行 Dev 的 `run` 函数中间件。
* 所以如果不想触发 Dev 的 `run` 函数中间件,不调用 `super.run` 即可 ...
## 高级用法
更多高级用法可以看以下几篇文档
* [指令](/ecosystem/artus-cli/advance/1.command.md)
* [多环境](/ecosystem/artus-cli/advance/2.env.md)
* [插件机制](/ecosystem/artus-cli/advance/3.plugin.md)
* [框架继承](/ecosystem/artus-cli/advance/4.framework.md)
* [Program & Util](/ecosystem/artus-cli/advance/5.program_util.md)
## Examples
体验用的相关 demo 例子都在:https://github.com/artus-cli/examples
* [simple-bin](https://github.com/artus-cli/examples/tree/master/simple-bin):简单 demo
* [singlefile](https://github.com/artus-cli/examples/tree/master/singlefile):单文件 demo
* [egg-bin](https://github.com/artus-cli/examples/tree/master/egg-bin):类似于 egg-bin 的 demo
* [chair-bin](https://github.com/artus-cli/examples/tree/master/chair-bin):继承 egg-bin 的 demo
* [override-bin](https://github.com/artus-cli/examples/tree/master/override-bin):继承 egg-bin 并覆盖指令的 demo
* [plugin-help](https://github.com/artus-cli/artus-cli/blob/master/src/plugins/plugin-help/index.ts):内置的 --help 插件
* [plugin-version](https://github.com/artus-cli/artus-cli/blob/master/src/plugins/plugin-version/index.ts):内置的 --version 插件
* [plugins/plugin-check-update](https://github.com/artus-cli/examples/blob/master/plugins/plugin-check-update):检查 bin 更新 demo
* [plugins/plugin-codegen](https://github.com/artus-cli/examples/tree/master/plugins/plugin-codegen):新增 codegen 单独指令的 demo
* [plugins/plugin-codegen-extra](https://github.com/artus-cli/examples/tree/master/plugins/plugin-codegen-extra):拓展 codegen 指令的 demo
---
url: /ecosystem/artus-cli/2.introduction.md
---
# Artus CLI 诞生过程
## 背景
命令行工具,是 Node.js 最初也是最大的应用场景,我们日常工作中会经常用到 NPM、Babel、Webpack 等 CLI,我们的应用的工程化也往往需要依托于自有的命令行工具。
目前业界已经有大量 CLI 工具库,以下几个均是大家比较耳熟能详的:
* [commander.js](https://github.com/tj/commander.js)
* 经典老牌类库,小巧精简,适合实现一些小 CLI 工具。
* 函数式定义指令配置,指令少的时候比较简洁直观。
* 缺少插件、框架、中间件等通用的拓展方案。
* 学习成本较低。
* [yargs](https://github.com/yargs/yargs)
* 功能比 commander 多且强大,能满足大部分独立 CLI 工具的需求。
* 也是函数式定义指令配置,指令少的时候比较简单直观。
* 提供了配置继承的能力,但是也缺少插件、框架等通用的拓展方案。
* 学习成本中等,主要是功能太多且复杂。
* [oclif](https://oclif.io/)
* 定位为 CLI 框架,功能强大且齐全。
* 通过传统类定义的方式定义指令配置,支持指令继承(但是似乎不支持继承配置),OOP 的编程风格让代码拆分较为简单。
* 具备较强的拓展能力和插件、生命周期钩子机制,但缺少框架方案,不易提供场景化的 CLI 框架封装,生命周期的钩子也没有中间件那么灵活。
* 学习成本中等偏上,比前两个多了不少概念。
为什么在上面的分析里面,我们都会考虑一个『扩展性』的需求呢?因为在我们过往的实践中,会涉及到社区开源和内部上层框架之间的协同问题:内部工具往往会继承于我们开源的社区工具,做一些私有逻辑,并会持续把企业的最佳实践下沉到社区。

这是 Egg 那边的一些真实实践:

其中的 common-bin 就是基于 yargs 封装的命令行框架,但是在多年实践中,我们也发现了 common-bin 的一些问题,比如年久失修、缺少插件机制、TS 不友好、缺少通用的切面逻辑 等等 ...
## 命令行框架
上文所说的场景,在 Artus 的体系里面,也有类似的情况,作为一个定位为框架的框架的开源项目,我们也不可避免的需要考虑对应的命令行场景。
在企业场景下,一个命令行除了常规的能力外,往往还有以下要求:
* 支持身份鉴权
* 支持灵活的定制化和扩展能力
* 具备一定的统一管控能力
* 自动化升级能力
* 现代化、健壮、便于测试
是不是觉得有点眼熟?这些要求其实跟一个 Web 框架很像,正好 Artus 的一个核心卖点就是协议无关性。那我们是不是可以基于 Artus 来封装一个 CLI 框架的框架呢?
试着对标下:
* 每一个 Command 是不是类似一个 Controller?
* Command 之间的公共逻辑是不是类似一个 Service?
* 支持身份鉴权,可以通过 Middleware 来统一拦截?
* 定制性和扩展能力,不正是插件机制么?
* 开源版本和企业版本的关系,不正是框架机制么?
Artus 天然具备了流水线、插件、框架、IoC 等能力,只需要额外再封装几个装饰器,实现下 argv 的 parser 能力,就很快能实现了。
不仅能让 CLI 的编程界面与我们应用的编程界面一致,减少开发者学习成本的同时,还能拓展 Artus 的使用场景,吃自己的狗粮。
甚至我们有时在命令行场景需要的一些能力,如 oss、redis 都可以直接复用 Artus 的生态了,也能直接引入 Artus 上层框架的一些 Loader 用于构建期的分析。
那还等什么? 干吧~
## 设计思路
* 基于 Artus 的 pipeline 流水线设计,将指令输入作为协议,将指令执行通过中间件模式串联,支持指令重定向。
* 用户编程风格方面,采用 IoC 的方式来定义指令、参数配置、中间件。

## 编程界面预览
```ts title="index.ts"
import { DefineCommand, Option, Command } from '@artus-cli/artus-cli';
@DefineCommand()
export class MyCommand extends Command {
@Option({
alias: 'p',
default: 3000,
description: 'port',
})
port: number;
async run() {
console.info('Run with port', this.port);
}
}
```
## 快速开始
创建项目
```bash title="iTerm"
$ npm init
```
安装 `artus-cli`
```bash title="iTerm"
$ npm i @artus-cli/artus-cli --save
```
初始化 ts 环境,然后创建文件 index.ts ,写入代码
```ts title="index.ts"
#!/usr/bin/env node
// index.ts
import { start } from '@artus-cli/artus-cli';
import { DefineCommand, Command } from '@artus-cli/artus-cli';
@DefineCommand()
export class MyCommand extends Command {
async run() {
console.info('hello artus cli');
}
}
start({ binName: 'my-bin' });
```
执行代码
```bash title="iTerm"
$ npx ts-node index.js
```
***
点击 [快速开始](/ecosystem/artus-cli/1.quickstart.md) 开始学习如何使用
---
url: /ecosystem/artus-cli/advance/1.command.md
---
# 指令
指令除了前面说的常规用法之外,还有一些高级技巧。
## 元数据继承
指令在使用 OO 的方式继承其他指令的时候,也会继承其他指令的所有配置信息( 包括 `Option`、`Middleware` ),这个跟一般 IoC 的类设计不太一致( 大部分是不会做继承元数据这么个操作的 ),指令之所以这样做,主要是因为指令的 Option 配置会比较多,如果不支持继承重复写的成本很高。
所以 artus-cli 默认开启了指令元数据继承的功能,如果不想使用元数据继承,也可以通过 `inheritMetadata` 配置关闭:
```ts title="config/config.default.ts"
export default {
inheritMetadata: false,
};
```
也可以只对指定的指令关闭
```ts title="VSCode"
import { DefineCommand, Command, Utils } from '@artus-cli/artus-cli';
// test command
@DefineCommand(
{
command: 'test',
},
{ inheritMetadata: false }
)
export class TestCommand extends Command {
async run() {
console.info('test');
}
}
```
## 指令重定向
存在一种场景需要对指令做重定向( 即更改执行指令 ),框架提供了 `Utils` 类( 下文有详细介绍 ),其中具备一些实用的工具函数。
比如上面的注入指令的例子,可以直接用重定向的方式
```ts title="VSCode"
import { DefineCommand, Command, Utils } from '@artus-cli/artus-cli';
// test command
@DefineCommand({
command: 'test',
})
export class TestCommand extends Command {
async run() {
console.info('test');
}
}
// coverage command
@DefineCommand({
command: 'cov',
})
export class CovCommand extends Command {
@Inject()
utils: Utils;
async run() {
console.info('coverage');
// 参数格式跟 process.argv 一致,也可以写 flags
return this.utils.redirect(['test']);
}
}
```
## 指令冲突与覆盖
如果两个指令的 command 除了 arugments 之外是一样的,为了避免开发时不小心写了同样的 command 导致难以快速排查出原因,框架目前针对同样的 command 会报错提醒指令冲突。
如果开发者确认就是需要覆盖指令,可以在 `DefineCommand` 的参数中传入 `overrideCommand` 参数来强制覆盖。
```ts title="VSCode"
import { DefineCommand, Command } from '@artus-cli/artus-cli';
// test command
@DefineCommand({
command: 'test',
})
export class TestCommand extends Command {
async run() {
console.info('test');
}
}
// new test command
@DefineCommand(
{
command: 'test',
},
{ overrideCommand: true }
) // 标识强制覆盖
export class NewTestCommand extends Command {
async run() {
console.info('new test');
}
}
```
---
url: /ecosystem/artus-cli/advance/2.env.md
---
# 多环境
环境能力是 artus 的内置能力,在 artus-cli 中也有一定使用场景。
## 如何配置
可以根据不同环境,让同一个指令产生不同的功能,只需要在 `plugin.{env}.ts` 配置不同插件即可,比如如下配置
```ts title="config/plugin.default.ts"
export default {
codegen: {
enable: true,
package: 'plugin-codegen',
},
};
// config/plugin.prod.ts
export default {
codegen: false,
codegenExtra: {
enable: true,
package: 'plugin-codegen-extra',
},
};
```
当默认环境执行 CLI ,此时 codegen 插件起作用,当时当带上环境变量 `ARTUS_CLI_ENV=prod` 执行 CLI 时,codegen 会被关闭,codegenExtra 将会起作用。
> 该功能适合的场景:比如同个 dev 指令,在不同租户环境下执行不同的逻辑,或者同个 build 指令,本地跟在构建机器上跑不同逻辑。非常适合做这种同指令不同场景做差异化的功能。
除了通过环境变量传环境参数,在入口文件的 start 方法中也可以传,CLI 可以自己决定如何控制该参数( 比如读取文件配置等 )
```ts title="VSCode"
#!/usr/bin/env node
import { start } from '@artus-cli/artus-cli';
// 可以在这里传环境
start({ artusEnv: 'prod' });
```
---
url: /ecosystem/artus-cli/advance/3.plugin.md
---
# 插件机制
插件能力由 artus 提供,定义方式也一致
## 使用插件
只需要在 `config/plugin.default.ts` 中写上开关配置即可
```ts title="config/plugin.default.ts"
export default {
pluginName: {
enable: true, // 开启插件
package: 'plugin-package-name',
},
// 也可以关闭内置插件
help: {
enable: false,
},
};
```
## 自定义插件
### 初始化
只需要三步
* 创建一个 TS 项目;
* 根目录下创建一个 `meta.json` 文件,并写入 `{ "name": "你的插件名称" }`;
* 注意:插件简写名称为开启插件时的 key 名,不能带特殊字符;
* 创建一个指令 `MyCommand.ts`,并通过 `DefineCommand` 声明指令。
这样你的一个 artus-cli 插件就定义好了。
### 定义插件配置
如果需要定义一些可以给用户配置的配置,只需要在插件中新建 `config/config.default.ts` 文件,然后编写配置
```ts title="config/config.default.ts"
export default {
// 命名最好跟插件名称保持一致
myPluginName: {
// 你的配置
},
},
```
在插件中的指令中可以通过 inject config 使用配置
```ts title="VSCode"
// MyCommand.ts
import { ArtusInjectEnum } from '@artus-cli/@artus-cli';
import myConfig from './config/config.default.ts';
// test command
@DefineCommand({
command: 'my',
})
export class MyCommand extends Command {
@Inject(ArtusInjectEnum.CONFIG)
config: typeof myConfig;
async run() {
console.info(this.config.myPluginName);
}
}
```
插件中通过 `DefineCommand` 定义的指令会被自动加载,所以插件可以做的很强大且方便,不仅限于用来拓展指令,也可以用来全局拦截,甚至能够用来覆盖已有指令。
### 插件例子
插件的实现,还可以参考以下插件例子,会持续更新 demo
* [plugin-help](https://github.com/artus-cli/plugin-help):内置的 --help 插件
* [plugin-version](https://github.com/artus-cli/plugin-version):内置的 --version 插件
* [更多插件例子](https://github.com/artus-cli/examples/tree/master/plugins)
---
url: /ecosystem/artus-cli/advance/4.framework.md
---
# 框架继承
:::warning
升级到 @artus/core 2.x 版本后,将不再支持框架继承,原 framework 将由 plugin 替代。
:::
框架是 artus 中的概念,在 artus-cli 中,你可以认为一个框架就是一个 CLI 工具,通过 artus 的框架能力多个 CLI 可以方便的继承和拓展。
## 框架声明
如果自己的 CLI 工具希望能被其他 CLI 工具继承,只需要跟插件一样定义一个 `meta.json` 声明一下框架名称即可
```json title="meta.json"
{
"name": "your framework name"
}
```
## 如何使用
在 `config/framework.ts` 中定义需要继承的 CLI 即可。
```ts title="config/framework.ts"
export default {
package: 'your-cli-name',
};
```
## 示例
可以参考 examples 中的上层封装例子:
* [egg-bin](https://github.com/artus-cli/examples/tree/master/egg-bin):类似于 egg-bin 的 demo
* [chair-bin](https://github.com/artus-cli/examples/tree/master/chair-bin):继承 egg-bin 的 demo
---
url: /ecosystem/artus-cli/advance/5.program_util.md
---
# 内置类 Program 及 Util
## Program
[Program](https://github.com/artus-cli/artus-cli/blob/master/src/core/program.ts) 是框架提供的 Singleton 原型,内置了一些便捷 API ,可以在生命周期中注入并使用,相关能力如下:
### 注册 Option
可以通过 Program 的 `option` 方法指定全局 Option 或者针对部分指令添加 Option 。使用方式如下
```ts title="VSCode"
@LifecycleHookUnit()
export default class UsageLifecycle implements ApplicationLifecycle {
@Inject()
private readonly program: Program;
@LifecycleHook()
async configDidLoad() {
const { rootCommand } = this.program;
// 注册全局生效的 Option
this.program.option({
help: {
type: 'boolean',
alias: 'h',
description: 'Show Help',
},
});
// 注册只对根指令生效的 option
this.program.option(
{
version: {
type: 'boolean',
alias: 'v',
description: 'Show Version',
},
},
[rootCommand]
);
}
}
```
### 注册中间件
除了前面通过装饰器注册中间件,也可以在 lifecycle 中通过 program 注册中间件( 三种中间件均支持 ),比如内置的 `plugin-version` 的实现:
```ts title="index.ts"
@LifecycleHookUnit()
export default class VersionLifecycle implements ApplicationLifecycle {
@Inject()
private readonly program: Program;
@LifecycleHook()
async configDidLoad() {
const { rootCommand } = this.program;
this.program.option(
{
version: {
type: 'boolean',
alias: 'v',
description: 'Show Version',
},
},
[rootCommand]
);
// intercept root command and show version
this.program.useInCommand(rootCommand, async (ctx: CommandContext, next) => {
const { args } = ctx;
if (args.version) {
return console.info(this.program.version || '1.0.0');
}
await next();
});
}
}
```
注册三种中间件的方法分别是:
* `use` 注册 pipeline 中间件
* `useInCommand` 注册指令中间件( 通过 program 注册到 command 的中间件不会被继承 )
* `useInExecution` 注册 run 函数中间件
## Utils
Utils 是框架提供的在 Execution 阶段使用的工具类,可以用于中间件或者在指令中注入并使用。提供了两个方法:
* `redirect(argv: string[])` 重定向指令,会新建 pipeline ,上面有过介绍。
* `forward(clz: typeof Command, args?: T)` 转发指令,入参是指令类,也可以传入参数( 如果传了会覆盖已有解析出来的参数 )。
* 跟 redirect 的差异:在当前 pipeline 触发( 即不会触发 pipeline middleware ),而 redirect 会新建 pipeline。
### 重定向
使用方式如下
```ts title="VSCode"
import { DefineCommand, Command, Utils } from '@artus-cli/artus-cli';
// test command
@DefineCommand({
command: 'test',
})
export class TestCommand extends Command {
async run() {
console.info('test');
}
}
// coverage command
@DefineCommand({
command: 'cov',
})
export class CovCommand extends Command {
@Inject()
utils: Utils;
async run() {
console.info('coverage');
// 参数格式跟 process.argv 一致,也可以写 flags
return this.utils.redirect(['test']);
}
}
```
### 转发
由于 forward 不会新建 pipeline,不会再解析 argv,所以传入的参数要求是转发的 Command 和已经解析好的 args ,使用方式如下
> 使用场景是在想在同个上下文中( 同样的 args 解析结果 ),直接转发到其他指令,要求这两个指令的 Options 是兼容的。
```ts title="VSCode"
import { DefineCommand, Command, Utils } from '@artus-cli/artus-cli';
// test command
@DefineCommand({
command: 'test',
})
export class TestCommand extends Command {
async run() {
console.info('test', this.file);
}
}
// coverage command
@DefineCommand({
command: 'cov',
})
export class CovCommand extends Command {
@Inject()
utils: Utils;
async run() {
return this.utils.forward(TestCommand);
}
}
```
---
url: /ecosystem/artus-cli/plugins/1.plugins_list.md
---
# 插件列表
## 内置插件
### plugin-help
提供 `--help` 功能,[使用文档](https://github.com/artus-cli/plugin-help)
### plugin-version
提供 `--version` 功能,[使用文档](https://github.com/artus-cli/plugin-version)
## 其他插件
### plugin-npmcheckupdate
自动检查版本更新,[使用文档](https://github.com/artus-cli/plugin-npmcheckupdate)
### plugin-autocomplete
提供 `zsh/bash` 下自动提示指令功能,[使用文档](https://github.com/artus-cli/plugin-autocomplete)
---
url: /ecosystem/artusx/1.quickstart.md
---
# 快速开始
本文将从开发者角度,详解如何搭建一个 ArtusX 应用。
## 环境
* 操作系统:支持 macOS、Linux、Windows(未验证)
* 运行环境:建议选择 LTS 版本,最低要求 18.x
## 初始化
我们推荐直接使用脚手架。只需几条简单指令,即可快速生成项目
```bash title="iTerm"
# install init tool
npm i -g @artusx/init
# create app
artusx-init --name webapp --type apps
```
启动项目:
```bash title="iTerm"
cd webapp
# install deps
pnpm i
# run the app
pnpm run dev
```
## 使用
### 目录结构
在 ArtusX 中,除 `config` 外,不对目录进行限定,为了更好的协作,建议通过 `MVC` 或者 `Module` 方式组织代码。
#### Module(推荐使用)
通过 module 方式组织代码,可避免在 import 是出现形如 `../../../service/api` 代码,便于快速找到所需文件
```bash title="iTerm"
.
├── package.json
├── README.md
├── src
│ ├── bootstrap.ts
│ ├── config
│ ├── index.ts
│ ├── module-api
│ │ ├── api.controller.ts
│ │ ├── api.schedule.ts
│ │ ├── api.middleware.ts
│ │ └── api.service.ts
│ └── view
└── tsconfig.json
```
#### Model-View-Controller
此处参考 Egg.js 中常用的目录结构来组织代码,历史项目可通过该方式迁移。
```bash title="iTerm"
.
├── package.json
├── src
│ ├── bootstrap.ts
│ ├── config
│ ├── index.ts
│ ├── controller
│ │ └── home.ts
│ ├── model
│ │ └── user.ts
│ ├── service
│ │ └── user.ts
│ ├── schedule
│ │ └── user.ts
│ └── view
└── tsconfig.json
```
### 插件策略
通过插件配置,可指定插件是否启用,也可使用本地插件。
```bash title="iTerm"
├── plugin.development.ts
└── plugin.ts
```
默认配置
```ts title="config/plugin.ts" {8-9}
export default {
artusx: {
enable: true,
package: '@artusx/core',
},
redis: {
enable: false,
package: '@artusx/plugin-redis',
// path: '../../plugins/plugin-redis'
},
};
```
### 应用配置
可通过运行时指定 `ARTUS_SERVER_ENV=development` 来启用不同的配置文件。
```bash title="iTerm"
├── config.default.ts
├── config.development.ts
└── config.production.ts
```
默认配置
```ts title="config/config.default.ts"
import path from 'path';
import { ArtusXConfig } from '@artusx/core';
export default () => {
const artusx: ArtusXConfig = {
port: 7001,
static: {
prefix: '/public/',
dir: path.resolve(__dirname, '../public'),
dynamic: true,
preload: false,
buffer: false,
maxFiles: 1000,
},
};
return {
artusx,
};
};
```
### Controller
`@arutsx/core` 默认集成了 web 常用插件,并提供了常用注解,方便用户快速增加添加处理逻辑。
:::tip
框架的 Web 能力由 Koa 上层封装实现,故而可以完整支持 Koa 的生态,同时也可以通过 Koa
的上下文扩展来实现更多功能。 在业务开发中,我们需要注意: 基于 Koa
的中间件机制,书写的业务逻辑,相当于一个 Koa 插件,无法向上兼容 ArtusX,故而挂载在 `ctx`
上的数据可能无法被 ArtusX 插件、中间件获取,如数据需被 ArtusX 插件、中间件消费,请使用
`ctx.context.output.data` 进行数据传递。
:::
#### @Controller
```ts title="controller/home.ts" {5}
import { ArtusXInjectEnum } from '@artusx/utils';
import { Controller, GET, POST, Inject } from '@artusx/core';
import type { ArtusXContext, NunjucksClient } from '@artusx/core';
@Controller()
export default class HomeController {
@Inject(ArtusXInjectEnum.Nunjucks)
nunjucks: NunjucksClient;
@GET('/')
@POST('/')
async home(ctx: ArtusXContext) {
ctx.body = this.nunjucks.render('index.html', { title: 'ArtusX', message: 'Hello ArtusX!' });
}
}
```
#### @Headers
```ts title="controller/home.ts" {7-9}
import { Controller, GET, Headers } from '@artusx/core';
import type { ArtusXContext } from '@artusx/core';
@Controller()
export default class HomeController {
@GET('/')
@Headers({
'x-method': 'home-controller',
})
async home(ctx: ArtusXContext) {
ctx.body = 'Hello ArtusX!';
}
}
```
#### @StatusCode
使用该注解时候,请勿直接通过 `ctx.body = 'Hello ArtusX!';` 赋值,请直接 `return` 想要返回的数据。
```ts title="controller/home.ts" {8,21}
import { ArtusXInjectEnum } from '@artusx/utils';
import {
ArtusInjectEnum,
ArtusXErrorEnum,
ArtusApplication,
Inject,
Controller,
GET,
StatusCode,
} from '@artusx/core';
import type { ArtusXContext, NunjucksClient } from '@artusx/core';
@Controller()
export default class HomeController {
@Inject(ArtusInjectEnum.Application)
app: ArtusApplication;
@Inject(ArtusXInjectEnum.Nunjucks)
nunjucks: NunjucksClient;
@GET('/')
@StatusCode(209)
async home(ctx: ArtusXContext) {
return this.nunjucks.render('index.html', { title: 'ArtusX', message: 'Hello ArtusX!' });
}
}
```
#### @ContentType
设置 ContentType,传参为 `string`,通过 `mine.lookup` 匹配正确类型。
> [https://www.npmjs.com/package/mime-types](https://www.npmjs.com/package/mime-types)
```ts title="controller/api.ts" {11}
import { Inject, GET, Controller, ContentType } from '@artusx/core';
import type { ArtusXContext } from '@artusx/core';
import APIService from './api.service';
@Controller('/api')
export default class APIController {
@Inject(APIService)
apiService: APIService;
@GET('/mockApi')
@ContentType('application/json; charset=utf-8')
async getInfo(ctx: ArtusXContext) {
ctx.body = await this.apiService.mockApi();
}
}
```
#### @Query / @Params / @Body
在业务开发中,通常需要对请求参数进行验证,此处使用 json-schema 定义参数类型,并使用 ajv 进行校验,校验结果存放在 `ctx.context.output.data` 中。
> [https://json-schema.org/specification](https://json-schema.org/specification)
定义数据类型
```ts title="validator.validator.ts"
import { JSONSchemaType } from '@artusx/core';
export interface QueryTypes {
foo: string;
bar?: string;
}
export const QueryScheme: JSONSchemaType = {
type: 'object',
properties: {
foo: { type: 'string' },
bar: { type: 'string', nullable: true },
},
required: ['foo'],
additionalProperties: false,
};
export interface ParamsTypes {
uuid: string;
}
export const ParamsScheme: JSONSchemaType = {
type: 'object',
properties: {
uuid: { type: 'string', nullable: false },
},
required: ['uuid'],
additionalProperties: false,
};
export interface BodyTypes {
key: number;
}
export const BodyScheme: JSONSchemaType = {
type: 'object',
properties: {
key: { type: 'integer', nullable: false },
},
required: ['key'],
additionalProperties: false,
};
```
调用示例
```ts title="validator.controller.ts" {25-27}
import { Controller, StatusCode, GET, Query, Params, Body, POST } from '@artusx/core';
import type { ArtusXContext } from '@artusx/core';
import {
QueryTypes,
QueryScheme,
BodyTypes,
BodyScheme,
ParamsTypes,
ParamsScheme,
} from './validator.validator';
@Controller('/validator')
export default class ValidatorController {
@GET('/:uuid')
@POST('/:uuid')
/**
* validator.index.handler
* @description validate query / params / body
* @example:
* - url: /validator/e8b847b9-cb23-4fbf-8e7c-0c4ba72b9629?foo=foo&bar=bar
* - body: { "key": 123456 }
*/
@Query(QueryScheme)
@Body(BodyScheme)
@Params(ParamsScheme)
@StatusCode(200)
async index(ctx: ArtusXContext): Promise